Skip to content

Backup and Restore OpenStack Volumes and Snapshots with Storware

Storware Backup and Recovery offers a comprehensive solution for protecting your OpenStack environment.

Here’s a step-by-step guide to get you started with backups and recovery:

Prerequisites:

  • OpenStack environment using KVM hypervisor and VMs with QCOW2 or RAW files.
  • Storware Backup and Recovery software.

Deployment:

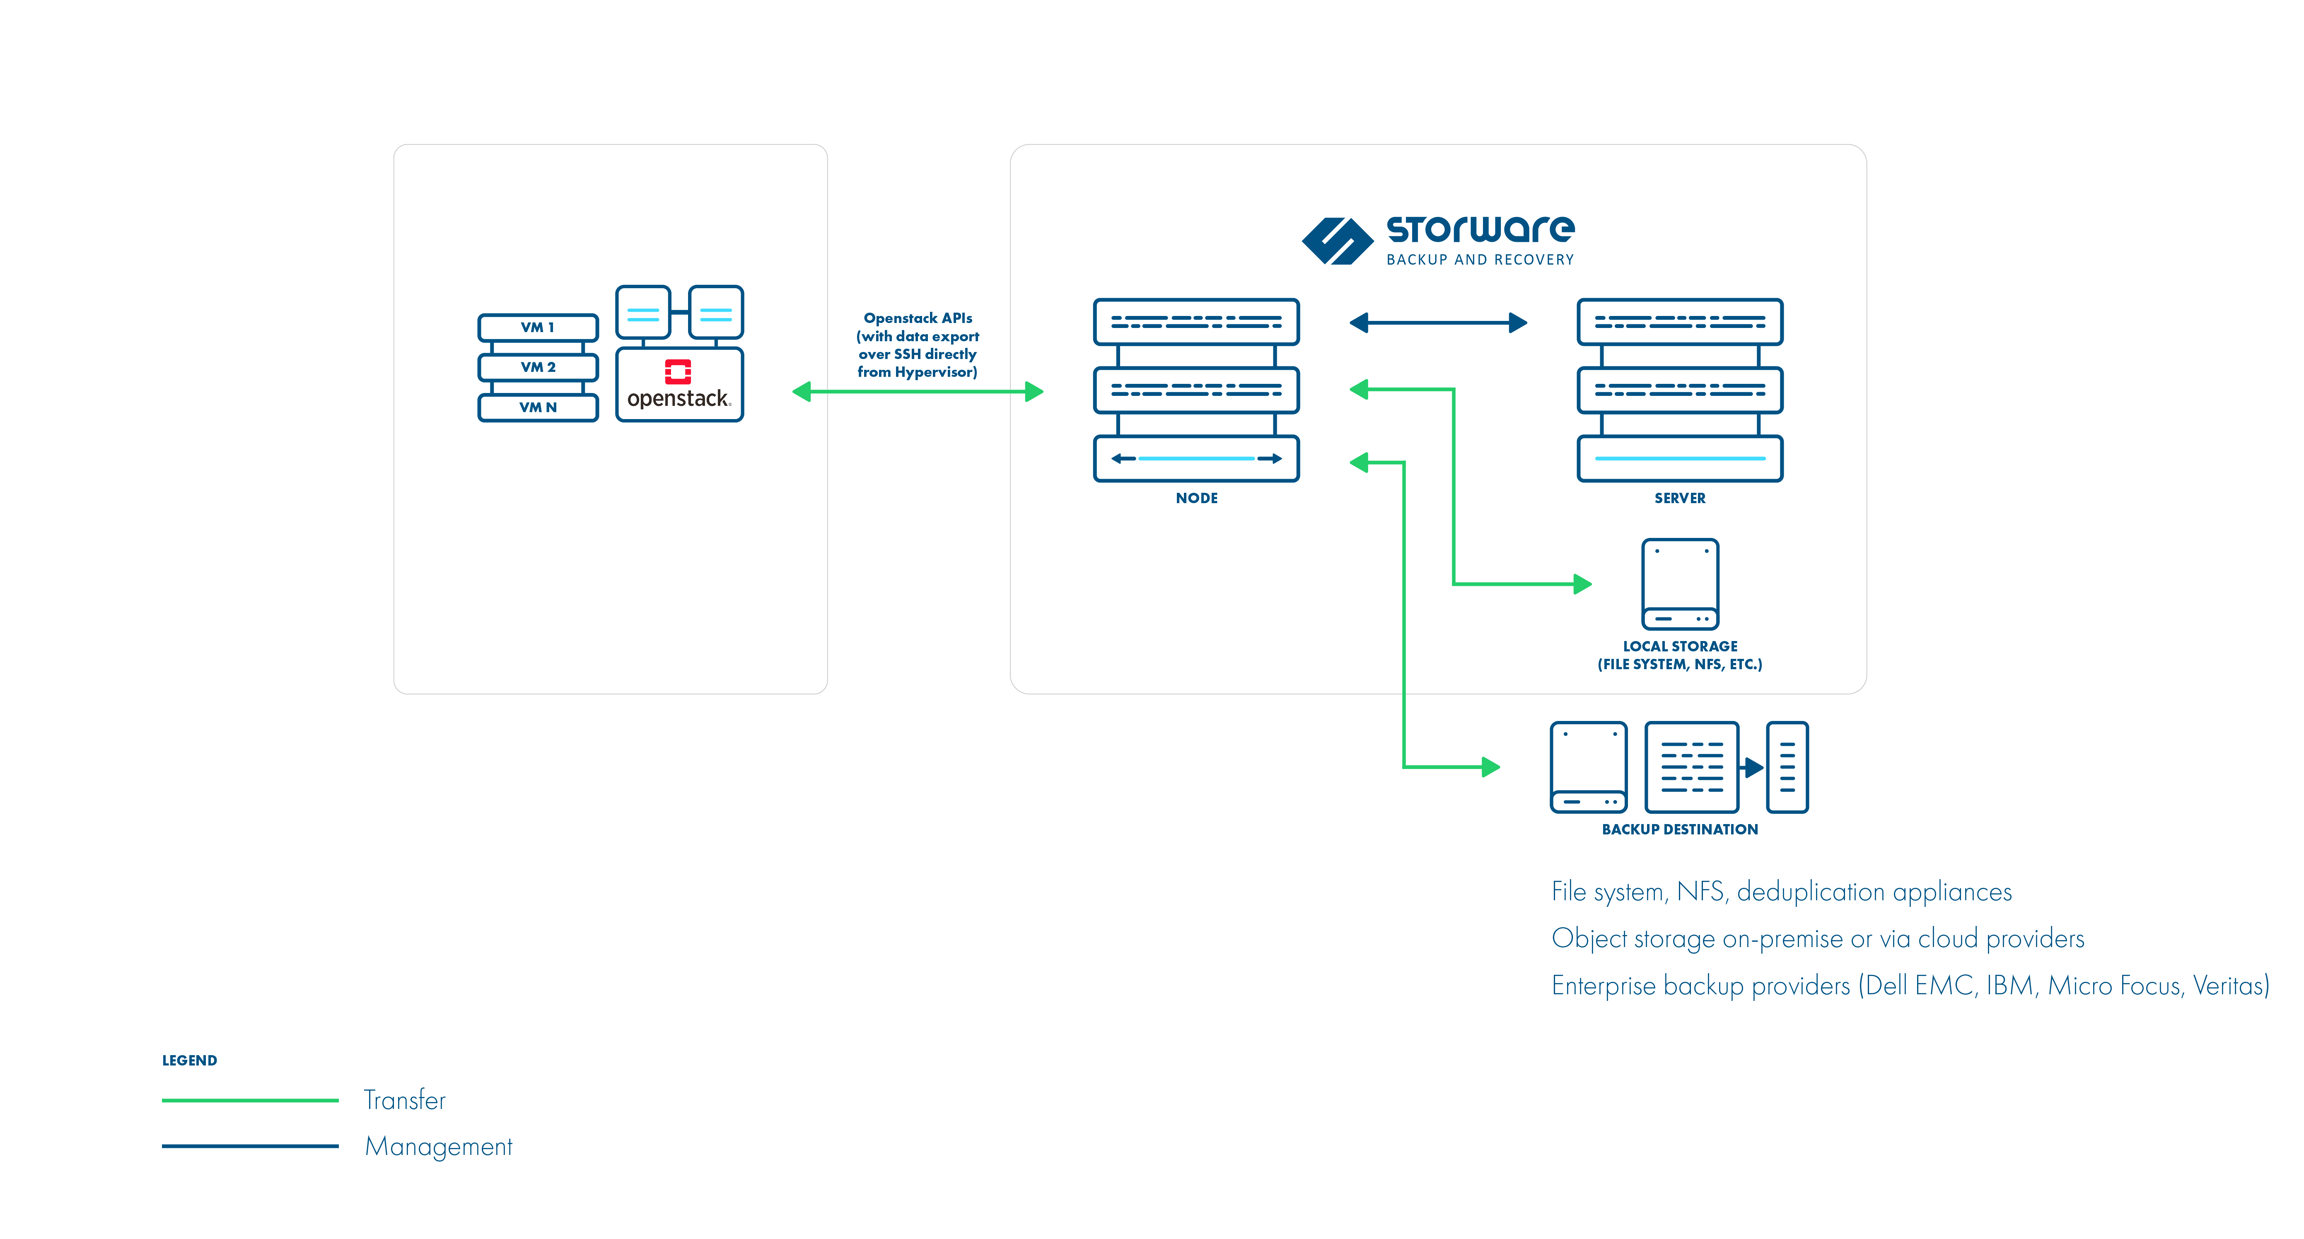
1. Install Storware Backup and Recovery Node: The Storware node can be installed on a separate machine. Ensure it has access to OpenStack APIs and hypervisor SSH.
2. OpenStack API Integration: Configure Storware to communicate with OpenStack APIs like Nova and Glance for metadata collection and VM restore processes.

Backup Configuration:

1. OpenStack UI Plugin (Optional): Install the Storware OpenStack UI plugin to manage backups directly from the OpenStack dashboard. This simplifies backup creation, scheduling, and restores.

2. Backup Schedules: Define backup schedules for your VMs. Storware supports both full and incremental backups.

3. Backup Options:

  • Libvirt strategy
  • Disk attachment strategy
  • Ceph RBD storage backend

All three strategies support full and incremental backups.

Libvirt strategy works with KVM hypervisors and VMs using QCOW2 or RAW files. It directly accesses the hypervisor over SSH to take crash-consistent snapshots. Optionally, application consistency can be achieved through pre/post snapshot command execution. Data is then exported over SSH.

Disk attachment strategy is used for OpenStack environments that use Cinder with changed block tracking. It uses a proxy VM to attach disks to the OpenStack instances. Snapshots are captured using the Cinder API. Incremental backups are supported. Data is read from the attached disks on the proxy VM.

Ceph RBD storage backend

Storware Backup & Recovery also supports deployments with Ceph RBD as a storage backend. Storware Backup & Recovery communicates directly with Ceph monitors using RBD export/RBD-NBD when used with the Libvirt strategy or – when used with the Disk-attachment method – only during incremental backups (snapshot difference).

Libvirt strategy

Disk attachment strategy

Retention Policies: Set retention policies to manage how long backups are stored.

Backup Process:

1. Storware interacts with OpenStack APIs to gather VM metadata.
2. Crash-consistent snapshots are taken directly on the hypervisor using tools like virsh or RBD snapshots.
3. (Optional) Pre-snapshot scripts run for application consistency.
4. VM data is exported using the chosen method (SSH or RBD).
5. Metadata is exported from OpenStack APIs.
6. Incremental backups leverage the previous snapshot for faster backups.

Recovery Process:

1. Select the desired VM backup from the Storware interface.
2. Choose the recovery point (specific backup version).
3. Storware recreates VM files and volumes based on the backup data.
4. The VM is defined on the hypervisor.
5. Disks are attached (either directly or using Cinder).
6. (Optional) Post-restore scripts can be run for application-specific recovery steps.

Additional Notes:

  • Storware supports both full VM restores and individual file/folder recovery.
  • The OpenStack UI plugin provides a user-friendly interface for managing backups within the OpenStack environment.
  • Refer to Storware documentation for detailed configuration steps and advanced options -> https://storware.gitbook.io/backup-and-recovery

By following these steps and consulting the Storware documentation, you can leverage Storware Backup and Recovery to safeguard your OpenStack VMs and ensure a quick recovery process in case of data loss or system failures.

About Storware
Storware is a backup software producer with over 10 years of experience in the backup world. Storware Backup and Recovery is an enterprise-grade, agent-less solution that caters to various data environments. It supports virtual machines, containers, storage providers, Microsoft 365, and applications running on-premises or in the cloud. Thanks to its small footprint, seamless integration into your existing IT infrastructure, storage, or enterprise backup providers is effortless.

About Version 2 Digital

Version 2 Digital is one of the most dynamic IT companies in Asia. The company distributes a wide range of IT products across various areas including cyber security, cloud, data protection, end points, infrastructures, system monitoring, storage, networking, business productivity and communication products.

Through an extensive network of channels, point of sales, resellers, and partnership companies, Version 2 offers quality products and services which are highly acclaimed in the market. Its customers cover a wide spectrum which include Global 1000 enterprises, regional listed companies, different vertical industries, public utilities, Government, a vast number of successful SMEs, and consumers in various Asian cities.

Step-by-Step Guide to Backup OpenStack Using Storware

Learn how to safeguard your OpenStack environment with Storware. This step-by-step guide provides a comprehensive overview of backup processes, ensuring data integrity and disaster recovery.

Prerequisites:

  • OpenStack environment setup and running.
  • Storware Backup and Recovery software installed and configured.
  • Administrative access to both OpenStack and Storware systems.
  • Backup storage configured in Storware.

Step 1: Configure Storware to Connect with OpenStack

1. Login to Storware Backup and Recovery Console:
  • Open a web browser and navigate to the Storware Backup and Recovery console URL.
  • Log in with administrative credentials.
2. Add OpenStack Environment:
  • Go to the Environments section.
  • Click on Add Environment.
  • Select OpenStack from the list of supported environments.
3. Enter OpenStack Credentials:
  • Provide the OpenStack API endpoint.
  • Enter the necessary credentials (username, password, tenant/project name).
  • Specify the domain name if using Keystone v3.
4. Test Connection:
  • After entering the details, click on Test Connection to ensure Storware can communicate with your OpenStack environment.
  • Once the connection is successful, save the configuration.

Step 2: Define Backup Policies

1. Create Backup SLA:
  • Navigate to the SLA Policies section.
  • Click on Create SLA Policy.
  • Define the backup schedule (e.g., daily, weekly), retention period, and any other relevant parameters.
  • Save the policy.
2. Assign SLA Policy to OpenStack Instances:
  • Go to the Virtual Machines or Instances section under your OpenStack environment in Storware.
  • Select the instances you want to back up.
  • Assign the previously created SLA policy to these instances.

Step 3: Perform Backup

1. Initiate Manual Backup (Optional):
  • Although backups will be performed according to the SLA policy, you can initiate a manual backup.
  • Select the instance you want to back up.
  • Click on Backup Now.
  • Monitor the backup progress in the Job Monitor section.
2. Monitor Backup Jobs:
  • Check the status of backup jobs in the Job Monitor section.
  • Ensure that backups are completed successfully.

Step 4: Recovery of OpenStack Instances

1. Identify the Backup to Restore:
  • Navigate to the Backup section.
  • Select the OpenStack environment.
  • Choose the instance you want to restore.
  • Browse through the available backup points.
2. Initiate Restore Process:
  • Select the backup point you wish to restore.
  • Click on Restore.
  • Choose the restore options (e.g., restore to the original instance or create a new instance).
3. Specify Restore Details:
  • If restoring to a new instance, provide the necessary details (e.g., instance name, flavor, network).
  • Confirm the restore operation.
4. Monitor Restore Jobs:
  • Go to the Job Monitor section to track the progress of the restore job.
  • Once the job completes, verify that the instance is restored correctly.

Step 5: Verify and Validate Backup and Restore

1. Verify Backups:
  • Periodically check the backups to ensure they are performed as per the defined schedule.
  • Conduct test restores to validate that backups are not corrupted and are usable.
2. Automate Monitoring:
  • Configure alerts and notifications in Storware to be informed of backup and restore job statuses.
  • Regularly review logs and reports for any anomalies or issues.

Step 6: Maintenance and Best Practices

1. Regular Updates:
  • Keep both OpenStack and Storware Backup and Recovery software updated to the latest versions to ensure compatibility and security.
2. Audit and Compliance:
  • Maintain logs of backup and restore activities for auditing purposes.
  • Ensure compliance with organizational data protection policies and regulatory requirements.
3. Disaster Recovery Planning:
  • Develop a comprehensive disaster recovery plan that includes detailed procedures for backup and restore.
  • Regularly test the disaster recovery plan to ensure readiness in case of an actual disaster.
By following these steps, you can effectively manage the backup and recovery of your OpenStack environment using Storware Backup and Recovery, ensuring data protection and minimizing downtime.

About Storware
Storware is a backup software producer with over 10 years of experience in the backup world. Storware Backup and Recovery is an enterprise-grade, agent-less solution that caters to various data environments. It supports virtual machines, containers, storage providers, Microsoft 365, and applications running on-premises or in the cloud. Thanks to its small footprint, seamless integration into your existing IT infrastructure, storage, or enterprise backup providers is effortless.

About Version 2 Digital

Version 2 Digital is one of the most dynamic IT companies in Asia. The company distributes a wide range of IT products across various areas including cyber security, cloud, data protection, end points, infrastructures, system monitoring, storage, networking, business productivity and communication products.

Through an extensive network of channels, point of sales, resellers, and partnership companies, Version 2 offers quality products and services which are highly acclaimed in the market. Its customers cover a wide spectrum which include Global 1000 enterprises, regional listed companies, different vertical industries, public utilities, Government, a vast number of successful SMEs, and consumers in various Asian cities.

Autonomous Data Protection

Will robots take over data management? In recent years, backup and disaster recovery system vendors have introduced several significant innovations. But the best is yet to come. 

Modern data protection solutions, encompassing backup, disaster recovery, replication, and deduplication, are constantly evolving. Manufacturers have moved from a stage of manual configuration to automation. However, this is not the end of the road. There is increasing talk about the era of autonomous backup and even autonomous data management. Is this a near future reality, or just a fantasy?

Opinions on this matter are divided. Skeptics cite the example of autonomous cars. Although prototypes have appeared on the streets of San Francisco, the road to their widespread adoption seems to be a long way off. On the other hand, proponents point to robotic vacuum cleaners that are displacing traditional vacuum cleaners from homes. If humans can be eliminated from processes that require high precision, why not do the same in areas closely related to IT?

Automation and autonomy are very similar concepts, sometimes incorrectly used interchangeably. Nevertheless, there are some subtle differences between them. Automation means that the tasks performed are based on pre-defined parameters that must be updated as the situation changes. This is how elevators, office software, washing machines, robotic assembly lines, and most backup and DR systems work.

On the other hand, autonomous processes differ from automated ones in that they are constantly learning and adapting to the environment. In such cases, human intervention is not needed or is minimal. A great example is the aforementioned robotic vacuum cleaners or driverless cars.

The authors of the concept of autonomous data management assume that processes should take place invisibly, although under human control. Autonomy somehow combines automation with artificial intelligence (AI) and machine learning (ML), so that the data protection system intuitively adapts to the situation.

AI and ML technologies enable the automation of data management processes and minimize human intervention and supervision. Proponents of such a solution argue that it increases operational efficiency, extends uptime, improves security, and the level of services offered.

Clouds Force Change

If companies only stored data in on-premises environments, it would be possible to do without autonomous tools, but in the last two years, things have become much more complicated. Enterprises have moved some of their assets to the public cloud, which has contributed to the growing importance of hybrid and multi-cloud environments. It was supposed to be easier and cheaper, but the ongoing adoption of cloud services is causing sleepless nights for many IT managers.

The main problem lies in the excessive dispersion of data, which is located both in the local data center and in external service providers such as Amazon, Google, Microsoft, or smaller local providers. Managing, and especially protecting, digital assets scattered across various locations is a challenge. The situation is worsened by the relatively narrow range of vendors’ tools optimized for managing corporate data for hybrid and multi-cloud environments.

Part of the products provide support for multiple clouds through centralized control, although they consume many expensive resources. There are also efficient solutions, but only within a single cloud environment. Their main drawback is scalability in the clouds of different providers. In any case, in both of the aforementioned cases, operating costs are higher than desired.

Another problem is the excessive haste in implementing cloud technologies, leading to an increase in the number of point solutions. Cloud environment architects, application developers, and analysts implement independent data management solutions, which deepens the chaos and limits the possibilities of central management.

The data protection strategy in the cloud environment also leaves much to be desired. Security specialists emphasize that in today’s world, the most effective way to stop attackers is through preventive measures. Unfortunately, most modern technologies take a passive approach to resources stored in the cloud. In practice, this means that they create backups and restore backups after an attack, which results in unplanned downtime.

In summary, autonomous backup supports operations in multiple clouds, eliminates functional silos, automates all processes with minimal human intervention, and increases cyber resilience through active methods of detecting and preventing ransomware attacks.

It has long been known that people are the weakest link in the data protection system. This is particularly evident in environments that require fast and data-driven decision-making. It is also undeniable that people are prone to errors and slower than AI-based solutions, especially when it comes to mundane, repetitive tasks.

So will robots send IT department employees to the pasture in the near future? So far, no one is talking about it loudly. According to the authors of the concept of autonomous data management, the best solution in a complex, hybrid and multi-cloud environment is autonomous work. This means that data will self-optimize and repair itself, as well as move between different environments. Self-optimization uses artificial intelligence and machine learning to adapt to the principles and services related to data protection and management. Self-healing is the ability to predict, identify, and correct service errors or performance issues.

On the other hand, self-service assigns appropriate protection policies and manages and deploys applications and services without human intervention. What does this mean?

In the traditional model, a programmer deploying a new application relies on manual processes, which lengthens it. Autonomous data management eliminates all manual tasks, while protecting the application throughout the process, without the need for additional actions on the part of the application developer or IT staff.

Autonomous Data Management – Is It Worth It?

The concept of autonomous data management looks very promising. Importantly, some backup and DR system vendors are announcing the launch of such solutions in the near future, not in the coming years. On the market, you can already find products that use Machine Learning to early detect anomalies that signal an attempt to attack the backup system. Some companies also use partially AI-based solutions combined with DLP systems, which helps classify and tag information, and thus copy and protect the most important data.

However, only the widespread adoption of systems that provide autonomous data management will allow us to answer the fundamental question – is it worth the effort?

Some data protection specialists warn against excessive optimism. In their opinion, the biggest obstacle to the adaptation of autonomy in backup and DR processes may be the collection of a sufficiently wide range of data to be able to analyze various scenarios. It is difficult to imagine that vendors of solutions would share such information with each other.

It is also difficult to count on the openness of IT department employees, as they may fear that new products will deprive them of their jobs. It can also be safely assumed that the term “autonomy” will be overused by marketers, which on the one hand encourages customer investment, and on the other hand, threatens that low ratings of disappointed users will deter potential customers. It is possible that there will be limitations related to computing power, as well as the costs of such a solution. Nevertheless, it is worth closely following such initiatives, especially as it concerns large companies and institutions storing data in different environments.

Storware develops towards autonomous

While full autonomy might still be a distant goal, Storware’s focus on AI and automation is a significant step in that direction. These features have the potential to significantly improve efficiency, reduce human error, and enhance overall data protection.

In the near future, Storware will implement a number of improvements that will allow for:

  • Automation: The Backup Assistant and conversational layer aim to automate routine tasks and provide intelligent responses, reducing human intervention.
  • Intelligence: Storebrain’s ability to learn from collective data and provide optimal configurations demonstrates a move towards intelligent decision-making.
  • Proactive Protection: The integration of AI into Isolayer for threat prevention showcases a proactive approach to data management, essential for autonomous systems.

However, key to achieving full autonomy would be further development in areas like:

  • Self-healing capabilities: The system should be able to identify and resolve issues independently.
  • Predictive analytics: Accurate forecasting of system behavior and potential problems.
  • Continuous learning: The system should constantly improve its performance based on new data and insights.

About Storware
Storware is a backup software producer with over 10 years of experience in the backup world. Storware Backup and Recovery is an enterprise-grade, agent-less solution that caters to various data environments. It supports virtual machines, containers, storage providers, Microsoft 365, and applications running on-premises or in the cloud. Thanks to its small footprint, seamless integration into your existing IT infrastructure, storage, or enterprise backup providers is effortless.

About Version 2 Digital

Version 2 Digital is one of the most dynamic IT companies in Asia. The company distributes a wide range of IT products across various areas including cyber security, cloud, data protection, end points, infrastructures, system monitoring, storage, networking, business productivity and communication products.

Through an extensive network of channels, point of sales, resellers, and partnership companies, Version 2 offers quality products and services which are highly acclaimed in the market. Its customers cover a wide spectrum which include Global 1000 enterprises, regional listed companies, different vertical industries, public utilities, Government, a vast number of successful SMEs, and consumers in various Asian cities.

Snapshots and Backups: A Nearly Perfect Duo

Snapshots and backups are both crucial for data protection. However, to maximize their benefits, it’s essential to understand their capabilities.

As data volumes and value continue to grow, data has become an invaluable asset for businesses, governments, consumers, and cyber-criminals alike. Cyber-criminals will stop at nothing to steal information or block legitimate users from accessing it. Fortunately, organizations have various tools and methods to protect their data, including backups and snapshots. While these methods share some similarities, they are often mistakenly seen as interchangeable. This article will delve into the fundamental differences between backups and snapshots and how they can complement each other.

The Indispensability of Backups

Until recently, it was common to say that people were either backing up their data or were planning to do so. However, this saying is no longer accurate. It’s increasingly difficult to find individuals or businesses that don’t perform backups. Backups are typically created on a regular schedule (e.g., nightly or multiple times a day) and can include all files on a server, emails, or databases. By archiving data in backups, users are protected against accidental data loss caused by errors, accidental deletions, or other failures. This is why backups are often referred to as “security copies.”

There are several types of backups. The simplest is a full backup, which creates a complete copy of the data to a destination storage device. Other methods include differential and incremental backups. A differential backup only backs up data that has been added or changed since the last full backup. An incremental backup, on the other hand, uses the previous backup as a reference point rather than the initial full backup.

A full backup is a complete copy of the data. If each backup is 10TB, for example, it will consume an additional 10TB of storage. Creating a backup every hour would consume 100TB of storage in just 10 hours. For this reason, storing multiple versions of backups is not a common practice.

The Role of RPO

A challenge with backups is achieving a suitable Recovery Point Objective (RPO), which defines the maximum amount of data loss that can be tolerated and the maximum acceptable time between a failure and the restoration of a system to normal operation. Businesses have varying requirements—some may be satisfied with a 24-hour RPO, while others strive for an RPO as close to zero as possible. For example, losing even a small amount of data in manufacturing companies can lead to production line downtime, lost product batches, and significant financial losses.

Some businesses determine their RPO based on the cost of storage compared to the cost of data recovery. These calculations help determine the frequency of backups. Another approach is to assess risk levels. In this case, a company evaluates which data can be lost without significantly impacting the quality and continuity of its business.

Backups are not optimal for creating short recovery points. Snapshots are much better suited for this purpose, which is why the two technologies should be used together. Snapshots are the preferred solution when high RPO requirements must be met, such as in 24/7 environments like internet service providers.

Snapshots for Specialized Tasks

A snapshot is a point-in-time capture of stored data. Its main advantage is its creation time, which is typically measured in minutes or even seconds. Snapshots are usually created every 30 or 60 minutes and have minimal impact on production processes. They allow for quick recovery to previous file versions at multiple points in time. For example, if a system is infected with a virus, files, folders, or entire volumes can be restored to a state before the attack.

However, snapshots are often a feature of NAS or SAN storage and are stored on that storage. This means they occupy relatively expensive storage capacity, and if the storage fails, users lose access to recent snapshot copies. While individual snapshots do not consume much space, their combined size can increase, leading to additional processing costs during recovery. Therefore, it’s good practice to limit the number of stored copies. Experts recommend not storing snapshots for longer than the last full backup.

Furthermore, migrating a snapshot from one physical location to another does not allow for environment restoration, which is possible with backups. Since a snapshot is not a complete copy of the data, it should not be considered the sole backup and should be combined with backups. In summary, backups provide the ability to restore data over long RPOs, often quickly and in detail, down to the file level.

Types of Snapshots

While snapshot creation processes vary by vendor, there are several common techniques and integration methods.

  • Copy-on-write: This method copies any blocks before they are overwritten with new information.
  • Redirect-on-write: Similar to copy-on-write, but it eliminates the need for a double write operation.
  • Continuous Data Protection (CDP): CDP snapshots are created in real-time, capturing every change.
  • Clone/mirror: This is an identical copy of an entire volume.

Summary

Snapshots and backups have their strengths and weaknesses. Generally, backups are recommended for long-term protection, while snapshots are intended for short-term use and storage. Snapshots are typically useful for restoring the latest version of a server within the same infrastructure.

Both snapshots and file backups can be used together to achieve different levels of data protection, and this is actually the most recommended configuration for backup strategies.

About Storware
Storware is a backup software producer with over 10 years of experience in the backup world. Storware Backup and Recovery is an enterprise-grade, agent-less solution that caters to various data environments. It supports virtual machines, containers, storage providers, Microsoft 365, and applications running on-premises or in the cloud. Thanks to its small footprint, seamless integration into your existing IT infrastructure, storage, or enterprise backup providers is effortless.

About Version 2 Digital

Version 2 Digital is one of the most dynamic IT companies in Asia. The company distributes a wide range of IT products across various areas including cyber security, cloud, data protection, end points, infrastructures, system monitoring, storage, networking, business productivity and communication products.

Through an extensive network of channels, point of sales, resellers, and partnership companies, Version 2 offers quality products and services which are highly acclaimed in the market. Its customers cover a wide spectrum which include Global 1000 enterprises, regional listed companies, different vertical industries, public utilities, Government, a vast number of successful SMEs, and consumers in various Asian cities.

Zero-touch Deployment for Macs with Scalefusion UEM

Have you ever bought a new gadget, only to find it packed with lengthy setup steps? Now suppose the same happening with every device in your company. That’s where zero-touch deployment steps in—removing the bother for IT admins and employees.

Zero-touch deployment for mac
What is Zero-touch Deployment for Mac?
Zero-touch deployment allows new Mac devices to be shipped directly to employees, fully configured and ready to go right out of the box. IT admins no longer need to spend hours configuring security settings, installing apps, or personalizing devices. Zero-touch deployment is a smarter way for businesses to manage their growing fleets of devices while keeping things simple for everyone involved.

The result? Happy employees, smoother operations, and an easier life for IT.

What is Zero-touch Deployment for Mac?
Zero-touch deployment on Mac is a method that enables IT teams to remotely configure and deploy Mac devices without the need for physical handling. When a MacBook is unboxed by an employee, it is already fully set up with the necessary applications, configurations, and security protocols in place.

This approach eliminates the need for IT to manually set up each device, as the entire process is automated. As a result, new hires or remote workers can start using their Mac devices immediately, enhancing productivity from day one. Zero-touch deployment is an efficient solution for businesses looking to streamline Mac device management while ensuring robust security and compliance measures are maintained.

The Key Benefits of Zero-touch: Simplifying Mac Deployments
1. Faster Deployments
Zero-touch deployment eliminates manual setup, allowing IT teams to configure and ship devices like Macs directly to users. For large-scale deployments, this drastically reduces time spent on device setup, enabling quick rollouts for new hires or department-wide refreshes.

2. Simplified Mac Enterprise Deployment
With Apple zero-touch deployment, devices are pre-configured with apps, settings, and security protocols, making it ideal for Mac enterprise deployment. IT teams can focus on other tasks instead of repetitive configurations.

3. Improved Security
Since all devices are set up with predetermined security policies, there’s no risk of users misconfiguring or skipping vital security steps. This ensures company-wide compliance and peace of mind.

4. Cost Efficiency
By automating the deployment process, companies can save significantly on labor and resources. IT teams can manage devices remotely, reducing the need for on-site staff, especially in remote work scenarios.

5. Consistency Across Devices
For businesses wondering, “How does IT benefit organizations with large-scale deployments?” Zero-touch ensures every device follows the same standard setup, resulting in uniformity across all Macs, regardless of location.

How to Implement Zero-touch Deployment for Mac with Scalefusion UEM
Step-by-Step Guide
Step 1: Log in to Scalefusion

Access your Scalefusion Dashboard.
Go to Getting Started > Apple Setup > ADE/DEP.
Step 2: Download ADE Public Key

Click the Download Public Key button and save the ADETokenKey.pem file.
Step 3: Set Up Scalefusion as an MDM Server

Log in to https://business.apple.com or https://school.apple.com/.
Navigate to Preferences (under your profile name) and go to MDM Servers.
Click Add to create a new MDM server.
Name the MDM server (e.g., “Scalefusion”).
Upload the Scalefusion ADETokenKey.pem file you downloaded.
Click Save and then download the Server Token.
Read more about: What is Apple Business Manager & What is Apple School Manager

Step 4: Upload the Server Token

Return to the Scalefusion Dashboard.
In the ADE/DEP section, upload the Server Token file you downloaded from ABM/ASM.
Click Next to complete the setup.
Step 5: Assign Devices to Scalefusion

In ABM/ASM, go to Device Enrollment and select Manage Devices.
Assign devices by their Serial Numbers,Order Numbers, or upload a CSV file with this information.
Choose Scalefusion as the MDM server for these devices.
Step 6: Sync Devices in Scalefusion

Return to the ADE/DEP section of Scalefusion.
Click Sync Now to sync the assigned devices. Automatic syncing may take up to 6 hours.
You can now see the synced devices listed under the Total Devices section.
Read more about: What is Apple DEP

Step 7: Start Enrollment

Unbox new devices or reset existing devices.
For new devices, go through the initial setup (language, Wi-Fi).
For existing iOS devices, navigate to Settings > General > Reset > Reset All Content & Settings.
For macOS, use CMD + R to reinstall macOS.
Step 8: Complete Enrollment

After initial setup, the devices will show a Remote Management screen.
Enter the required credentials (email, OTP) for User Authenticated Enrollment, if enabled.
Follow the remaining steps to complete the enrollment.
Step 9: Check Enrollment Status

Verify the enrollment status of your devices in the Scalefusion Dashboard under Devices. The devices will be managed automatically under the chosen configuration.
This setup enables zero-touch deployment, allowing ADE devices to automatically enroll into the Apple MDM as soon as they are set up or reset.

Wrapping Up: The Future of Mac Enterprise Deployment
Zero-touch deployment is more than just a convenience—it’s a transformation in how businesses manage their devices. As organizations scale, particularly those deploying a large number of Macs, the simplicity and efficiency of automating the setup process become invaluable.

With Scalefusion UEM, IT teams can streamline operations, ensure security, and maintain consistency across all devices, no matter where they are. Whether you’re deploying 10 or 1,000 Macs, this solution ensures your teams are always ready to work, right out of the box.

About Scalefusion
Scalefusion’s company DNA is built on the foundation of providing world-class customer service and making endpoint management simple and effortless for businesses globally. We prioritize the needs and feedback of our customers, making sure that they are at the forefront of all decision-making processes. We are dedicated to providing comprehensive customer support services, and place emphasis on customer-centric thinking throughout the organization.

About Version 2 Digital

Version 2 Digital is one of the most dynamic IT companies in Asia. The company distributes a wide range of IT products across various areas including cyber security, cloud, data protection, end points, infrastructures, system monitoring, storage, networking, business productivity and communication products.

Through an extensive network of channels, point of sales, resellers, and partnership companies, Version 2 offers quality products and services which are highly acclaimed in the market. Its customers cover a wide spectrum which include Global 1000 enterprises, regional listed companies, different vertical industries, public utilities, Government, a vast number of successful SMEs, and consumers in various Asian cities.